


Safety Training Seminars

The Heartsaver Infant CPR Algorithm offers a clear, easy-to-follow method for responding to infant cardiac emergencies. Learn how to recognize unresponsiveness, perform proper chest compressions and ventilations, and use an AED when available. This algorithm empowers lay rescuers to act quickly, safely, and confidently to improve infant survival outcomes.
The Heartsaver Infant CPR Algorithm saves lives. This American Heart Association protocol gives lay rescuers a clear, step-by-step process for helping infants in cardiac emergencies. Unlike adult CPR, infant resuscitation requires specific techniques designed for babies under one year old.
Every parent, babysitter, and childcare provider should know this algorithm. Cardiac arrest can happen to anyone at any age. When it strikes an infant, you have minutes—not hours—to act. The Heartsaver protocol transforms panic into purposeful action.
Infants have unique anatomy that demands modified CPR techniques. Their chests are smaller and more fragile than adult chests. Their airways are narrower. Their hearts beat faster. These differences mean adult CPR techniques can actually harm an infant.
The Heartsaver Infant CPR Algorithm addresses these differences. It uses gentler compressions, smaller rescue breaths, and different hand positions. The algorithm also recognizes that infants can’t tell you they’re in trouble—you must rely on visual cues.
An infant is defined as any child younger than one year old. This includes newborns, babies who are a few months old, and children approaching their first birthday. Once a child turns one, they move into the pediatric category with different CPR protocols.
Safety comes first. Before touching the infant, scan the area for dangers. Look for electrical hazards, fire, toxic fumes, or unstable surfaces. If the scene isn’t safe, you can’t help anyone.
Once you’ve confirmed safety, check the infant’s responsiveness. Tap the bottom of their foot firmly and shout loudly. A responsive infant will cry, move, or make sounds. An unresponsive infant shows none of these signs.
Shout for help immediately, but stay with the infant. Other people nearby might assist with calling emergency services or finding an AED. Don’t leave the infant alone unless absolutely necessary.
Your next move depends on whether you’re alone or have help available. This decision affects the timing of everything that follows.
If another person is present, send them to call 911 and locate an automated external defibrillator (AED). Tell them to return quickly with both emergency services on the phone and the AED if available.
If you’re alone, start CPR immediately. Perform CPR for exactly 2 minutes—approximately 5 cycles of 30 compressions and 2 breaths. After these 2 minutes, carry the infant with you to call 911 and get an AED. Then return immediately to continue CPR.
Watch the infant’s chest carefully for 5 to 10 seconds. Look for normal, regular breathing patterns. The chest should rise and fall smoothly and consistently.
Gasping is not normal breathing. Irregular, labored, or absent breathing requires immediate CPR. Agonal gasps—infrequent, irregular breaths—are actually a sign of cardiac arrest, not recovery.
If the infant is breathing normally, monitor them closely and wait for emergency services. If breathing is absent or abnormal, place the infant on their back on a firm, flat surface and begin chest compressions immediately.
Proper hand placement is critical for effective infant compressions. You have two options depending on your hand size and the infant’s size.
For most rescuers, use two fingers of one hand. Place your middle and ring fingers on the lower half of the breastbone, just below the nipple line. Keep your fingers straight and perpendicular to the chest.
If you can encircle the infant’s chest with both hands, use your thumbs instead. Place both thumbs side by side on the lower breastbone with your fingers wrapping around to support the infant’s back.
Push hard and fast, compressing the chest about 1.5 inches deep—approximately one-third of the chest’s total depth. Compress at a rate between 100 and 120 compressions per minute. Count out loud: “1 and 2 and 3 and…”
Allow complete chest recoil between compressions. Don’t lean on the chest. The upstroke is just as important as the downstroke for blood circulation.
Perform 30 compressions, then move immediately to rescue breaths.
Open the infant’s airway using the head-tilt/chin-lift technique. Place one hand on the infant’s forehead and gently tilt the head back. Use your other hand to lift the chin slightly. Don’t hyperextend the neck—infants have shorter necks than adults.
Create a seal over both the infant’s nose and mouth with your mouth. Unlike adult CPR, you cover both openings simultaneously. Give a gentle puff of air lasting about 1 second. Watch for the chest to rise visibly.
If the chest doesn’t rise, reposition the head and try again. Too much force can damage the infant’s delicate lungs. Too little won’t provide adequate ventilation.
Give a second breath, watching for chest rise each time. Then return immediately to chest compressions.
Repeat the cycle: 30 compressions followed by 2 breaths. Don’t stop to check for signs of life unless the infant obviously recovers—starts crying, moving purposefully, or breathing normally.
If an AED becomes available, turn it on immediately and follow the voice prompts. Some AEDs have special pediatric pads for infants. If pediatric pads aren’t available, adult pads can be used—place one on the chest and one on the back.
Continue CPR until one of three things happens: the infant shows obvious signs of life, another trained person takes over, or emergency medical services arrives and assumes care.
Many well-meaning rescuers make mistakes that reduce CPR effectiveness. Compressions that are too shallow won’t circulate blood adequately. Compressions that are too deep can cause serious injury.
Don’t interrupt chest compressions unnecessarily. Blood circulation stops when compressions stop. Minimize interruptions to maximize the infant’s chances of survival.
Avoid mouth-to-mouth contact during rescue breaths. Always use the proper head-tilt/chin-lift technique to open the airway before giving breaths.
Don’t give up too early. Continue CPR until professional help arrives, even if the infant doesn’t respond immediately. Brain damage from oxygen deprivation takes several minutes to become irreversible.
At Safety Training Seminars, we understand that knowing the Heartsaver Infant CPR Algorithm intellectually differs vastly from applying it confidently during a real emergency. That’s why we offer comprehensive American Heart Association-certified courses designed specifically for parents, childcare providers, and community members who want to be prepared.
Our Heartsaver CPR and First Aid courses cover the complete infant CPR algorithm with hands-on practice using realistic training manikins. You’ll master proper compression depth, hand placement, and rescue breathing techniques under expert guidance. We also include AED training and choking relief procedures, giving you a complete toolkit for infant emergencies.
What sets our training apart is our commitment to practical, stress-tested learning. Our instructors simulate real emergency scenarios, helping you stay calm and focused when seconds count. We offer courses throughout California at over 70 convenient locations, with flexible scheduling that includes evenings and weekends.
The American Heart Association certification you’ll receive is valid for two years and meets requirements for most childcare positions, healthcare roles, and workplace safety programs. More importantly, you’ll have the confidence and skills to potentially save an infant’s life.
Don’t wait until an emergency strikes to wish you knew what to do. Contact Safety Training Seminars today to enroll in our next Heartsaver course and transform your good intentions into life-saving abilities.
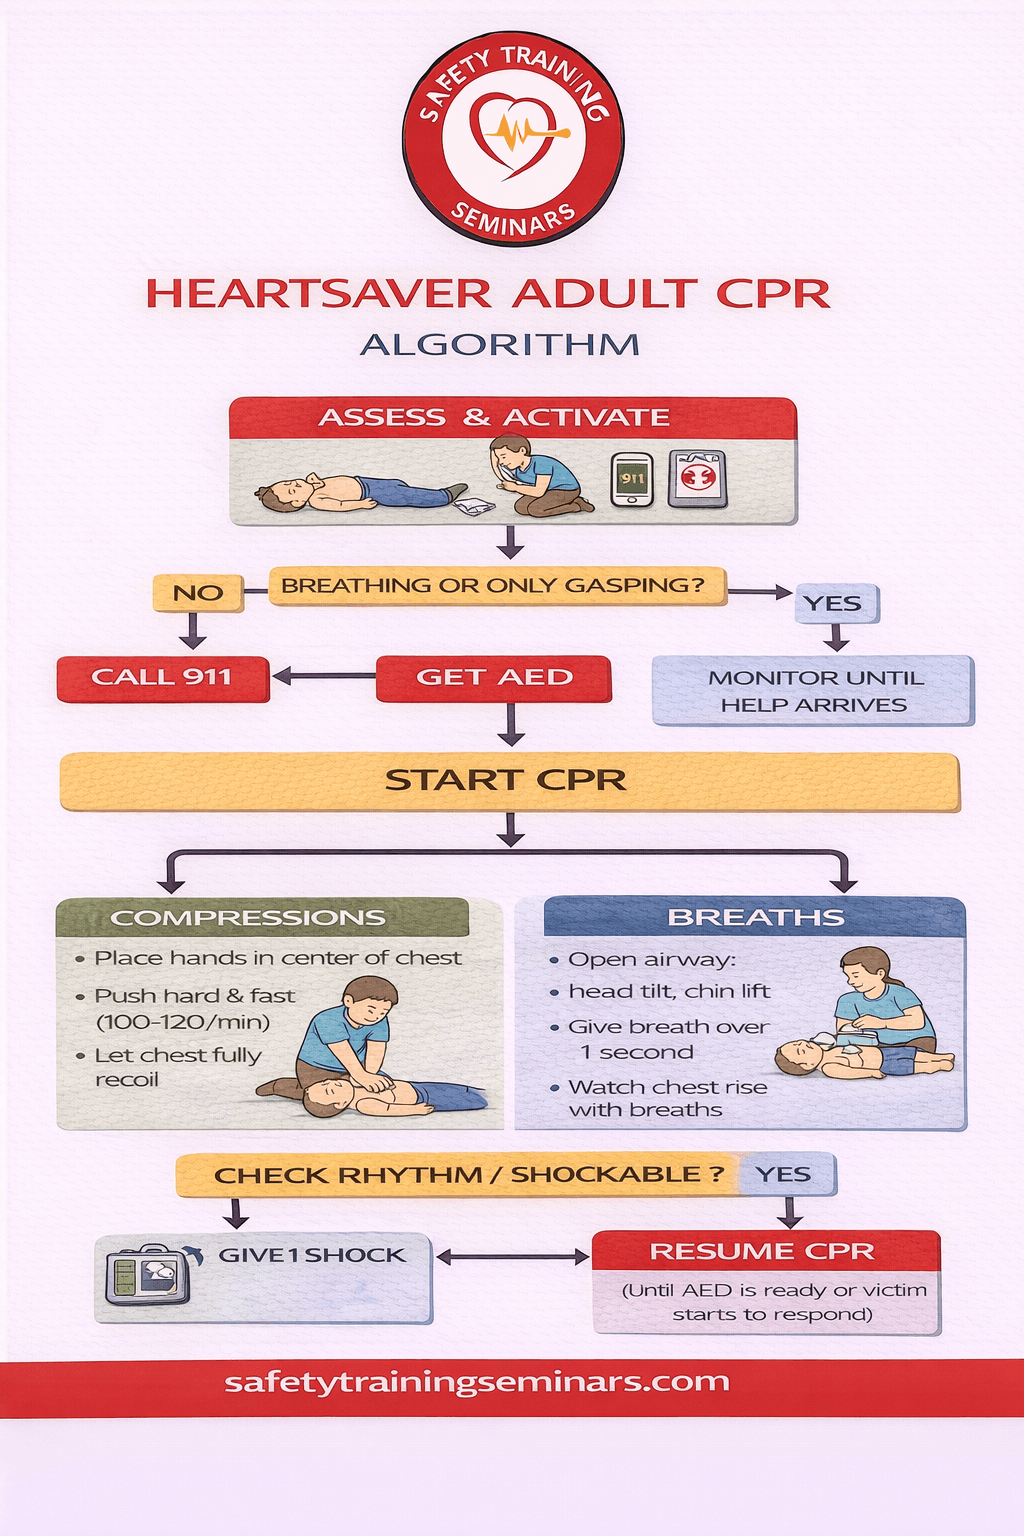
The Heartsaver Adult CPR Algorithm is a step-by-step visual guide designed to help responders act quickly and confidently during adult cardiac emergencies. This infographic from Safety Training Seminars breaks down complex lifesaving actions into simple, easy-to-follow steps, ensuring that anyone, whether trained or untrained, can provide effective help. The algorithm emphasizes rapid recognition of cardiac arrest, immediate activation of emergency services, and high-quality chest compressions, all of which are critical for improving survival outcomes.
The infographic clearly demonstrates how to assess the scene for safety, check for responsiveness, and determine if the patient is breathing normally. It shows when to call emergency services and how to retrieve and use an AED efficiently. The Heartsaver Adult CPR Algorithm also highlights proper chest compression techniques, including correct hand placement, depth, and rhythm, while emphasizing the importance of full chest recoil and minimal interruptions. These visual cues make it easier for learners to remember key steps and act confidently under pressure.
Furthermore, the infographic explains when rescue breaths are needed and how to integrate AED use seamlessly during CPR. By presenting the algorithm in a clear, visual format, Safety Training Seminars helps learners retain critical knowledge, build confidence, and respond effectively in real-life emergencies. This infographic not only simplifies learning but also ensures responders are prepared to deliver timely, high-quality care, ultimately saving lives during sudden adult cardiac arrest.
The Heartsaver Infant CPR algorithm is a structured approach for responding to cardiac arrest in infants under one year old. It outlines checking responsiveness, calling for help, performing CPR, and using an AED when appropriate. Safety Training Seminars teaches this algorithm step by step.
Infant CPR uses two fingers for compressions, a depth of about 1.5 inches, and a ratio of 30 compressions to 2 breaths for single rescuers. The focus is on gentle but effective technique. Heartsaver training at Safety Training Seminars ensures correct infant-specific care.
The recommended compression rate for infant CPR is 100–120 compressions per minute. Maintaining proper rhythm and depth is critical for effective circulation. Safety Training Seminars provides hands-on infant manikin practice to reinforce correct pacing.
Yes, AEDs can be used on infants using pediatric pads or pediatric energy settings when available. If not available, adult AEDs may be used following guidelines. Safety Training Seminars teaches safe AED use for infants in Heartsaver CPR training.
Infant emergencies often occur at home or in childcare settings, where immediate response is critical. Proper training improves confidence and response time. Safety Training Seminars offers AHA-approved Heartsaver courses that prepare caregivers to act quickly and correctly.