


Safety Training Seminars

The BLS Infant 2-Person CPR Algorithm based on AHA 2025 Guidelines delivers a coordinated, team-based approach for infant resuscitation. Learn proper rescuer roles, compression-to-ventilation ratios, airway support, and AED integration to ensure high-quality CPR, reduce delays, and improve survival outcomes during infant cardiac emergencies.
Knowing how to respond in an emergency can make all the difference, especially when an infant is involved. Basic Life Support (BLS) for an infant requires specific techniques that differ from those used for adults. When two rescuers are present, the approach changes slightly, but the goal remains the same: to provide effective, life-saving care.
Performing CPR on an infant can be an intimidating thought. However, understanding the correct procedure for two-person CPR can significantly improve the quality of care and increase the chances of a positive outcome. A two-rescuer approach is more efficient, as it allows for continuous, high-quality chest compressions and effective ventilations while minimizing rescuer fatigue.
Before diving into the steps, it’s important to understand what makes infant CPR unique. The anatomy of an infant requires modifications to ensure safety and effectiveness.
Your first priority in any emergency is to ensure the environment is safe for both you and the infant.
Quickly scan the area for any immediate dangers, such as traffic, fire, or other hazards. If the area is unsafe, move the infant to a safer location before starting any assessment or treatment.
Once the scene is safe, check if the infant is responsive. Gently tap the bottom of the infant’s foot and call out their name if you know it. Look for any movement or sound. Do not shake the infant.
If the infant is unresponsive, one rescuer should immediately call 911 or activate the emergency response system. If a mobile phone is available, put it on speakerphone so you can communicate with the dispatcher while performing CPR. The second rescuer should stay with the infant and prepare to begin CPR.
With one rescuer calling for help, the other should immediately start the CPR sequence.
Quickly check for breathing by observing the chest for any rise and fall. Simultaneously, check for the brachial pulse on the inside of the upper arm for no more than 10 seconds. If there is no pulse or breathing (or only gasping), begin CPR immediately.
The first rescuer should position themselves to perform chest compressions.
After 15 compressions, the second rescuer gives two breaths.
As soon as an AED is available, it should be used. One rescuer continues CPR while the other prepares the AED.
Turn on the AED and follow its voice prompts. Use pediatric pads if available. If not, adult pads can be used, but ensure they do not touch each other. Place one pad on the center of the infant’s chest and the other on the center of the back.
The AED will analyze the infant’s heart rhythm. It is crucial that no one touches the infant during this analysis.
If the AED advises a shock, ensure everyone is clear of the infant and press the shock button.
Immediately after the shock is delivered, or if no shock is advised, resume CPR starting with chest compressions. Continue the 15:2 cycle.
To maintain the quality of CPR, rescuers must switch roles to prevent fatigue.
The switch should happen approximately every two minutes, which is about ten cycles of 15 compressions and 2 breaths. The rescuer performing compressions should call out the switch to ensure a smooth transition.
The goal is to minimize any pause in chest compressions. The switch should be as quick as possible, ideally taking less than five seconds. While one rescuer moves to the head to provide breaths, the other moves to the chest to take over compressions.
Continue performing CPR, switching roles every two minutes, and following the AED prompts until emergency medical services arrive and take over, or until the infant begins to breathe and move on their own.
Reading about BLS is an important first step, but hands-on training is essential to build the muscle memory and confidence needed to act effectively in a real emergency. At Safety Training Seminars, we offer comprehensive, American Heart Association-certified BLS courses that provide practical, in-person skills testing.
Our courses are designed for both medical professionals and the general public, with over 70 locations throughout California. As a woman-owned business established in 1989, we are committed to providing high-quality training at the lowest prices, guaranteed. You even receive your certification card on the same day you complete your class.
Don’t wait for an emergency to happen. Prepare yourself to save a life by booking a BLS, CPR, or First-Aid course with us today.
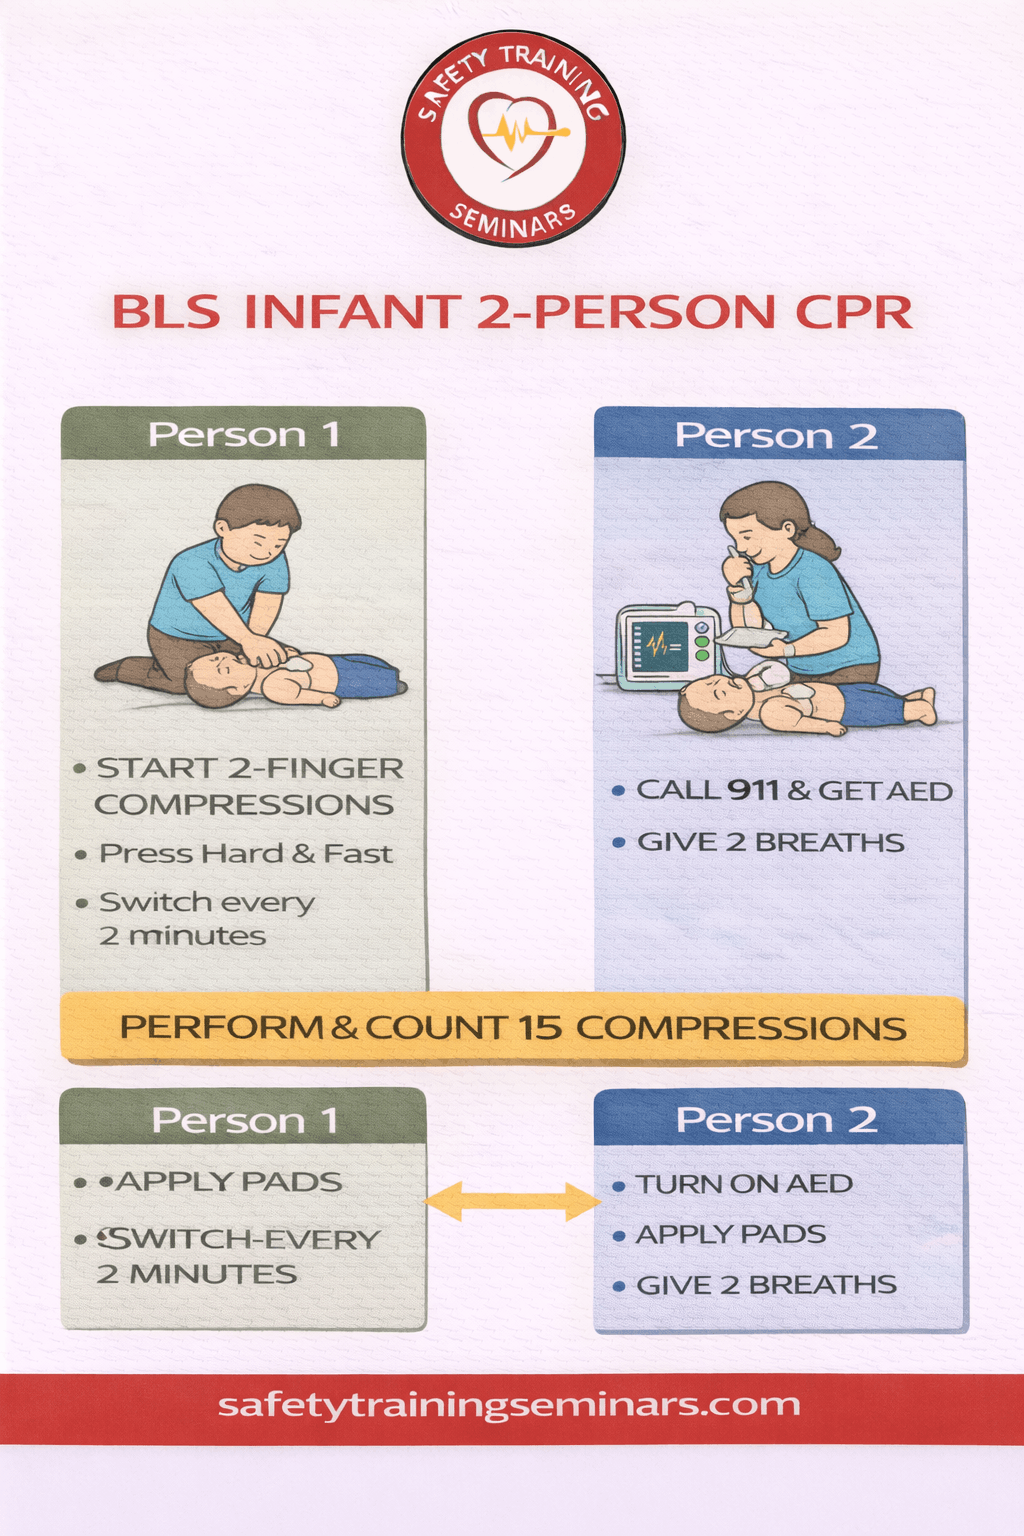
BLS Infant 2-Person CPR is a critical lifesaving technique designed for emergencies involving infants under one year of age when two trained responders are present. This method follows the latest American Heart Association (AHA) guidelines and focuses on delivering high-quality chest compressions, effective ventilations, and seamless team coordination. In a two-rescuer scenario, one responder is responsible for chest compressions while the other manages airway and breathing, allowing for improved CPR quality and reduced rescuer fatigue. This approach is especially important in clinical, childcare, and community settings where rapid, organized response can significantly increase an infant’s chance of survival during cardiac or respiratory arrest.
The infographic highlights the correct hand positioning, compression depth, and compression-to-ventilation ratio for infant CPR. Rescuers use the two-thumb encircling hands technique, which provides better compression consistency and blood flow compared to single-rescuer methods. The standard ratio of 15 compressions to 2 breaths ensures adequate circulation and oxygenation. Clear visuals also explain proper head-tilt chin-lift positioning, rescue breath delivery using a barrier device, and how to avoid excessive ventilation. These visual cues reinforce accuracy, speed, and confidence during high-stress situations.
Safety Training Seminars emphasizes practical, real-world application of BLS Infant 2-Person CPR through structured training and clear visual learning. The infographic also demonstrates smooth role switching, effective communication between rescuers, and integration with an AED when available. By mastering these steps, healthcare providers, caregivers, and first responders can deliver fast, coordinated, and guideline-compliant care. Understanding and practicing BLS Infant 2-Person CPR equips responders with the skills needed to act decisively, protect infant lives, and meet professional certification standards with confidence.
2-person infant CPR is a coordinated resuscitation technique for infants under 1 year old. Two trained rescuers perform compressions and ventilations together, ensuring effective oxygen delivery and improved survival.
One rescuer provides chest compressions using two fingers (or hands for larger infants) while the second delivers ventilations with a bag-mask or mouth-to-mouth. Roles are switched every 2 minutes to maintain efficiency.
For two rescuers, the recommended ratio is 15 compressions to 2 breaths. This allows more frequent ventilations without interrupting compressions, which is crucial for infants whose arrests often originate from respiratory issues.
It should be used whenever two trained responders are present, especially in hospitals or EMS settings. This approach increases efficiency, reduces fatigue, and improves oxygenation during resuscitation.
Proper training ensures rescuers can perform coordinated compressions and ventilations effectively. Safety Training Seminars provides hands-on, AHA-aligned courses to increase infant survival during cardiac emergencies.