


Safety Training Seminars

The Heartsaver Infant Choking Algorithm delivers clear, easy-to-follow guidance for recognizing and relieving airway obstruction in infants. Learn proper back blows, chest thrust techniques, and transition steps if the infant becomes unresponsive. This lifesaving, evidence-based approach empowers caregivers and lay responders to act quickly, safely, and confidently during choking emergencies.
Witnessing an infant choke is a terrifying experience for any parent, guardian, or caregiver. Knowing the correct steps to take can make all the difference in a life-threatening emergency. The American Heart Association (AHA) has developed the Heartsaver Infant Choking Algorithm, a clear, step-by-step procedure designed to help you act quickly and effectively.
By learning this vital skill, you can be prepared to save a life when every second counts.
The Heartsaver Infant Choking Algorithm is a sequence of actions recommended by the American Heart Association for relieving a severe airway obstruction in an infant (a child under one year of age). This procedure is designed for lay rescuers—people who are not healthcare professionals but want to be prepared for emergencies. The algorithm is a crucial component of first-aid and CPR training programs like the AHA’s Heartsaver courses.
Understanding the difference between a mild and severe obstruction is the first critical step.
If you determine an infant is severely choking, you must act immediately. The following steps outline the correct procedure for a responsive infant.
First, quickly assess the infant. Are they unable to cry, cough, or breathe? If you see these signs, you have a severe obstruction. Shout for help. If someone is nearby, tell them to call 911 immediately. If you are alone, do not leave the infant. Begin the choking relief procedure and perform two minutes of care before stopping to call 911 yourself.
To perform back blows, you need to position the infant safely.
Each blow should be a separate, distinct attempt to dislodge the object.
If the back blows do not clear the airway, you must immediately switch to chest thrusts.
Like the back blows, each thrust is a separate attempt to force the object out.
Continue the cycle of 5 back blows followed by 5 chest thrusts until the object is expelled or the infant becomes unresponsive. After each set of back blows and chest thrusts, if the infant is still responsive, quickly look inside their mouth for the object. If you can see the object and can easily remove it with your fingers, do so. Never perform a blind finger sweep, as this could push the object deeper into the airway.
If the infant stops responding, becomes limp, or stops breathing, you must change your approach immediately.
Reading about the Heartsaver Infant Choking Algorithm is an important first step, but hands-on training is essential to build the confidence and muscle memory needed to act effectively in a real emergency. This is where getting certified can make a world of difference.
At Safety Training Seminars, we provide official American Heart Association (AHA) courses, including Heartsaver Pediatric First Aid CPR AED, which covers the infant choking algorithm in detail. Our certified instructors guide you through realistic scenarios using manikins, ensuring you master the techniques for back blows and chest thrusts. As an official AHA Training Center, we offer certification classes for the general public and healthcare providers across more than 70 locations in California. Upon completion of our blended learning course—which includes a short online portion and a brief in-person skills session—you receive your AHA certification card the very same day.
Don’t wait until an emergency happens. Equip yourself with the skills to protect the most vulnerable. Book a certification class with us today and gain the confidence to act when it matters most.
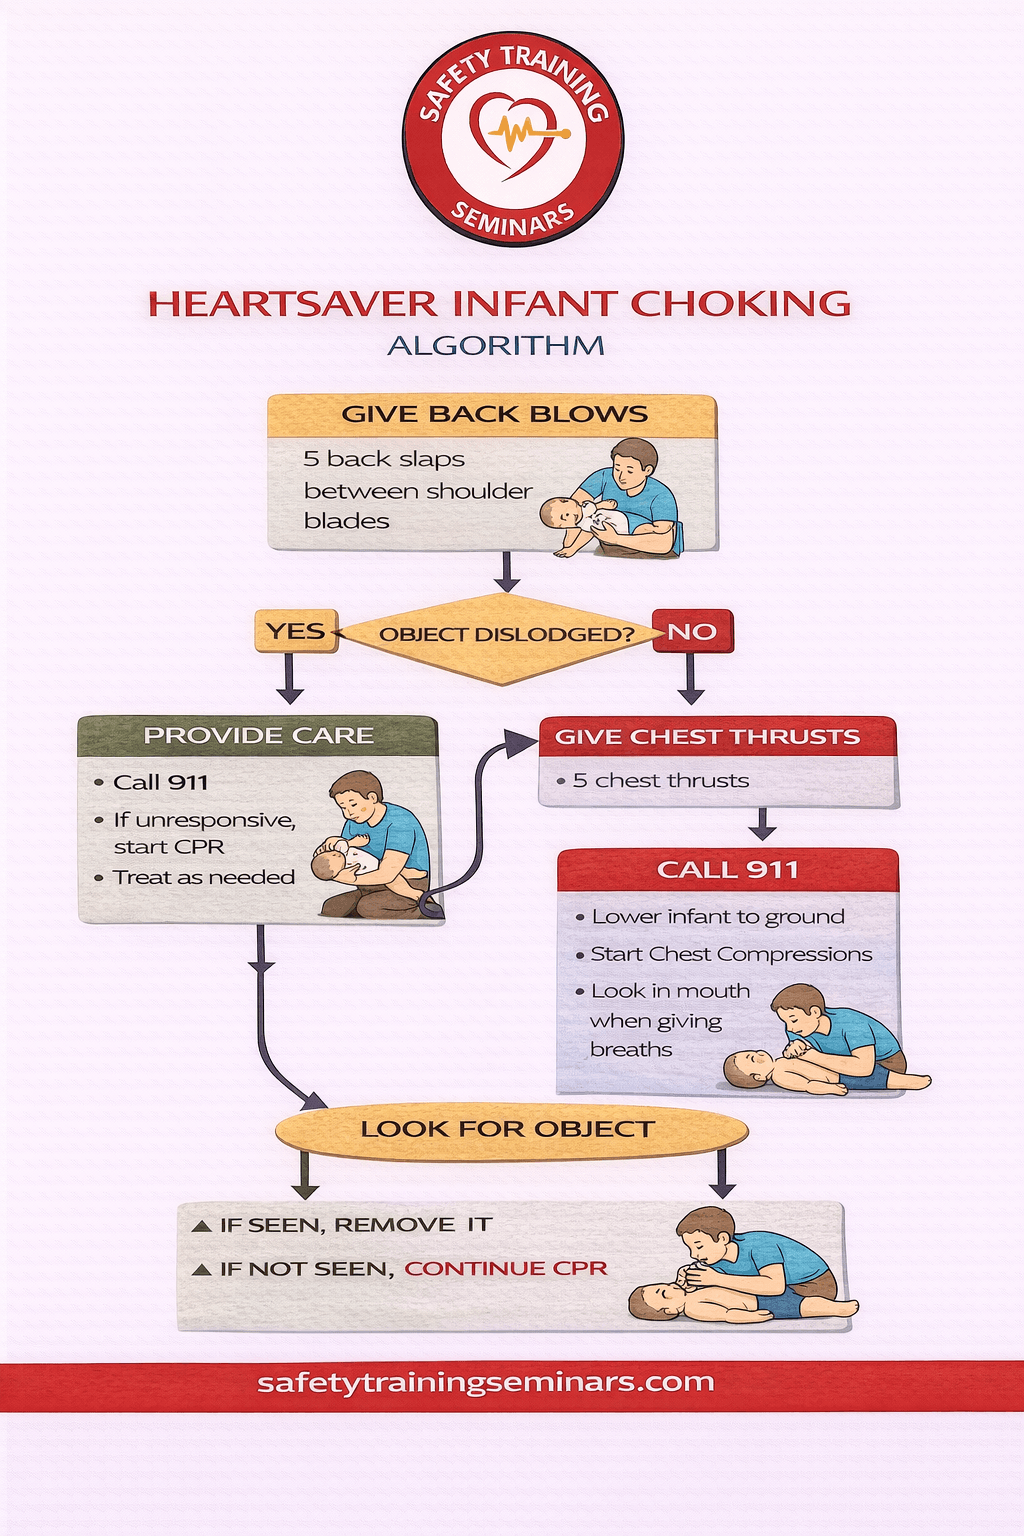
Understanding the Heartsaver Infant Choking Algorithm is essential for anyone caring for infants, as quick and correct action can save a life. This infographic breaks down the step-by-step procedure recommended by the American Heart Association for responding to choking in infants under one year old. It visually guides caregivers through recognizing the signs of choking, assessing the severity, and performing the appropriate interventions confidently and efficiently.
The first step in the algorithm emphasizes assessing the infant’s responsiveness and breathing. If the infant is conscious but choking, the infographic illustrates the correct placement and technique for back blows and chest thrusts. It highlights performing five firm back blows between the infant’s shoulder blades followed by five gentle chest thrusts, ensuring the head is lower than the chest to allow gravity to assist in dislodging the object. The content also underscores the importance of avoiding blind finger sweeps, which can push the obstruction deeper.
For severe cases or when the infant becomes unresponsive, the algorithm clearly transitions into performing infant CPR, combining chest compressions with rescue breaths while calling emergency services. The infographic format simplifies the sequence, making it easier for parents, babysitters, and healthcare providers to memorize and act swiftly. By following this evidence-based, visually guided approach, caregivers can improve survival outcomes and minimize complications. Safety Training Seminars provides this comprehensive resource to empower individuals with practical knowledge, reinforcing the critical life-saving steps in the Heartsaver Infant Choking Algorithm.
The Heartsaver infant choking algorithm outlines how to relieve airway obstruction in infants under one year old. It uses back slaps and chest thrusts instead of abdominal thrusts. Safety Training Seminars teaches this algorithm using AHA-approved methods.
An infant who is choking may be unable to cry, cough, or breathe and may appear cyanotic. Immediate action is required. Heartsaver training teaches responders how to quickly identify these warning signs and respond safely.
The correct technique includes five back slaps followed by five chest thrusts while supporting the infant’s head and neck. This cycle continues until the object is expelled or the infant becomes unresponsive. Proper positioning is a key focus in training.
If the infant becomes unresponsive, begin CPR and check the airway for visible objects before giving breaths. Emergency services should be activated immediately. Safety Training Seminars ensures students practice these critical steps hands-on.
Infants are at high risk of choking, especially during feeding. Proper training reduces hesitation and improves outcomes. Safety Training Seminars prepares parents, babysitters, and healthcare providers to respond with confidence.